[CAN 02] - Setting up SocketCAN on Linux
Setting up SocketCAN
Previous Post:
In the previous post, we discussed the basics of CAN bus and its applications in robotics. In this post, we will learn how to set up SocketCAN on Ubuntu computers to set up CAN communication.
Hardware
I have tested the following USB-CAN adapters with SocketCAN on Ubuntu 22.04 with 6.8.0-48-generic kerneal and 5.15.129-rt67 real-time kernel.
- Makerbase CANable 2.0 USB to CAN adapter
- USB CAN Converter Module
- DSD TECH USB to CAN Adapter
- PCAN-USB FD - make sure to compile the driver with
netdevoption. The default ischardevwhich is not compatible with SocketCAN.
Setting up SocketCAN
Install can-utils by running:
sudo apt install can-utils
The can-utils repository allows user to debug and test the CAN bus via terminal commands.
Plug the USB-CAN device into the computer, and you can check the device by running:
lsusb

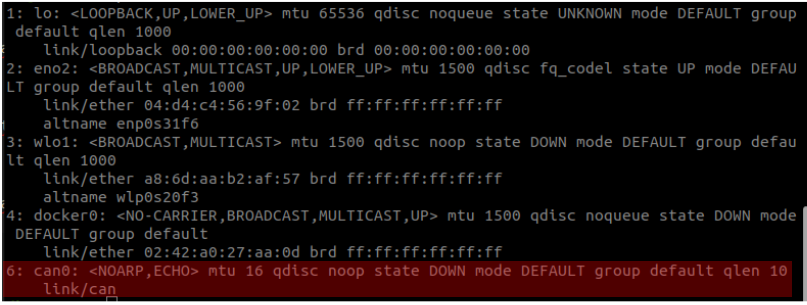
Based on the what frimware in installed in our USB-CAN adapter, we may need to manually load your device. Since SocketCAN is network interface, we can use ip command to check the status of CAN bus if the firmware is Candlelight assuming it’s a CANable device. Run the following command:
ip link ls

If you see your CAN bus like can0, follow the Option 1.
If you don’t see your can bus like can0, you have to manually load it by slcan (CAN over serial line interfaces) by following the Option 2.
Changing USB-CAN device firmware
If your device is compatible with CANable firmware, you can change the frimware to either candlelight or slcan. with candlelight the usb-can device shows up as a native CAN device with SocketCAN and has higher performance than slcan. However, candlelight frimware is not compatible with CAN-FD.
Most CANable devices come with slcan firmware, and `slcan enumerates as a serial device with CAN-FD support.
Option 1: Using candlelight to set up CAN bus
To set the CAN bus to UP state with 500 kpbs baudrate, run:
sudo ip link set up can0 type can bitrate 500000
And you can adjust the baudrate by changing the bitrate argument.
Run ip link ls to check the status of the CAN bus.

Option 2: Using slcan to set up CAN bus
check the USB port number of the USB-CAN device by running:
ls /dev/ttyACM*
Then your device may show up as /dev/ttyACMx. While x is an arbitrary number depending on other USB devices connected to your computer. You can run the following command to load the device (make sure to replace x with the number you found):
sudo slcand -o -c -s6 /dev/ttyACMx can0
-s6 argument determines the baudrate of the CAN bus. The options are:
-s0 = 10k
-s1 = 20k
-s2 = 50k
-s3 = 100k
-s4 = 125k
-s5 = 250k
-s6 = 500k
-s7 = 750k
-s8 = 1M
Then you can check the status of the CAN bus from ip link ls command. You should see the can0 device is at DOWN state.
In order to read and write to CAN bus, you have to bring the can0 device UP state by running:
sudo ifconfig can0 up

IMPORTANT: If you unplug the USB-CAN device and plug it back in, your USB port number may change (x in
/dev/ttyACMx). To avoid checking the USB port number every time create a symlink in/devusing/etc/udev/rules. To do that you need to know your vendor and product ID of the USB-CAN device.
Setting up udev rules to create symlink for slcan
I am testing this with Makerbase CANable 2.0 USB to CAN adapter. Run the following command to get the vendor and product ID of the USB-CAN device:
lsusb
then you will see the output like:
==> Bus 001 Device 042: ID 16d0:117e MCS CANable2 b158aa7 GitHub - normaldotcom/canable2-fw
16d0 is your ATTRS{idVendor}, and 117e is your ATTRS{idProduct}
Now create a new rule by this command:
sudo nano /etc/udev/rules.d/99-usb-serial.rules
use 99 ~ 90 to prevent override
and add the following to the rules file:
ACTION=="add", SUBSYSTEM=="tty", ATTRS{idVendor}=="16d0", ATTRS{idProduct}=="117e", SYMLINK+="ttycan"
ctrl + x and y to save and exit. ttycan can be replaced your desired symlink name (for me, SYMLINK name had to be all lowercase in order to work).
reload the udev/rules.d by: sudo udevadm control --reload-rules
Unplug and plug back in the USB-CAN module just in case, and run:
ls -l /dev/ttycan
Then it should output:
==> lrwxrwxrwx 1 root root 7 Sep 12 14:01 /dev/ttycan -> ttyACM5
You can see that ttycan is linked to ttyACMx Lastly, compare udevadm info -a /dev/ttyACM5 and udevadm info -a /dev/ttycan to make sure they output the same result.
You can now use /dev/ttycan instead of /dev/ttyACMx in the slcand command.
sudo slcand -o -c -s6 /dev/ttycan can
sudo ip link set up can0 type can
Netx Post: Communicating to ESP32 with SocketCAN